Xbox App Can't Choose Drive: 8 Ways to Fix it
Find out how experts fixed the issue in a jiffy
Key notes
- Many users have recently reported being unable to install games in the desired drives from the Xbox app in Windows 11.
- The likely issues could be misconfigured storage settings, folder permissions, or a corrupted drive.
- Also, find out about Xbox Game Pass, a subscription to play more than a hundred games on your computer.

The Xbox app has also been a part of Windows 10, and it offered the gaming community an all-inclusive platform. You can link your Xbox account with the computer, browse through a vast collection of games, play them, and connect with others across devices.
However, several users in the recent past have reported that the Xbox app can’t choose the drive on Windows 11. Simply put, they cannot choose a purpose other than the one selected by default.
While some don’t even bother checking the install location of a game, others effectively organize the files and apps stored on the system, and this error posed a major setback to them.
In this article, we will explore all the fixes for the error along with the other relevant information that would aid the troubleshooting process.
What is preventing the Xbox app from selecting a drive?
Various issues could lead to trouble when choosing a different drive while installing a game. We have listed the most prominent ones:
- Misconfigured storage settings
- Bugs in the current version of Windows
- Lack of permissions
- Corrupted storage
The error largely depends on the four problems listed above. If you can identify the one in your computer, directly head to the relevant fix for it; otherwise, execute them in the same sequence for a quick troubleshooting process.
What can I do if the Xbox app can’t select the drive on Windows 11?
1. Change the drive Xbox downloads games to
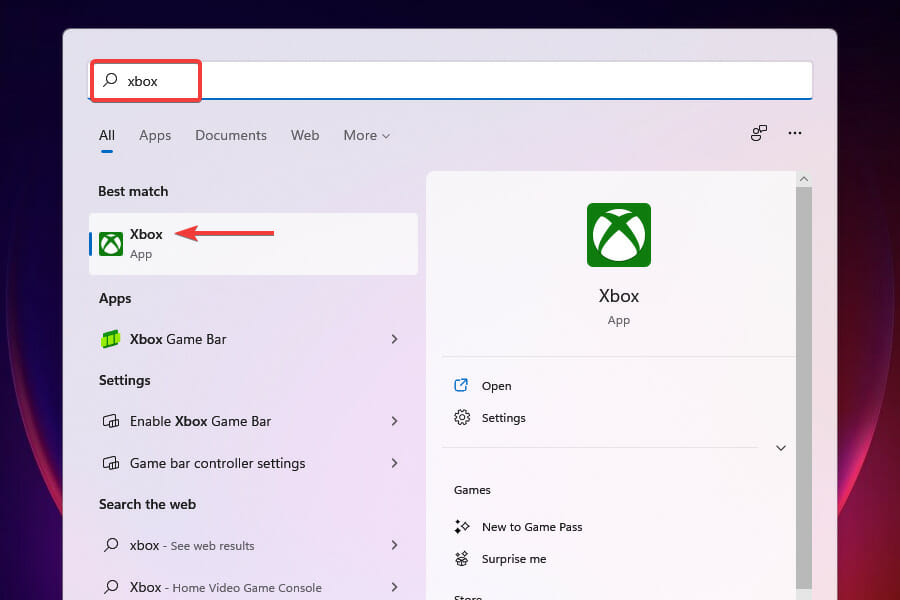
- Press Windows + S to launch the Search menu, enter Xbox in the text field at the top, and click on the relevant search result to launch the app.

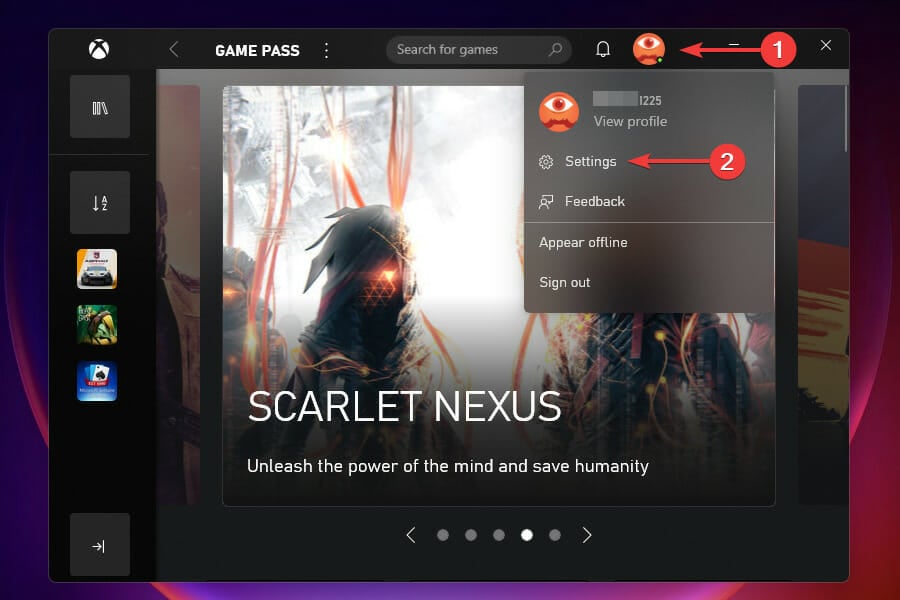
- Click on the Profile icon near the top-right and select Settings from the flyout menu.

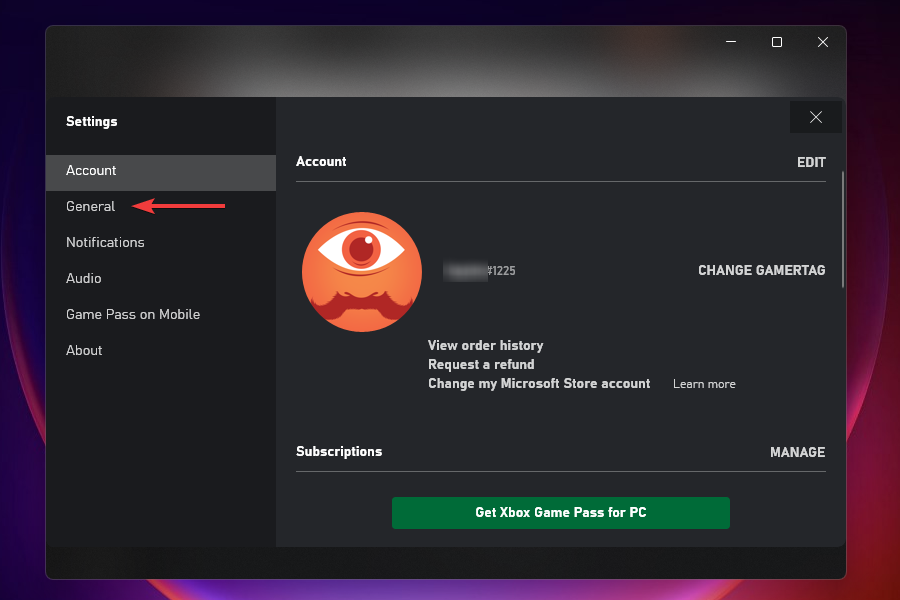
- Go to the General tab.

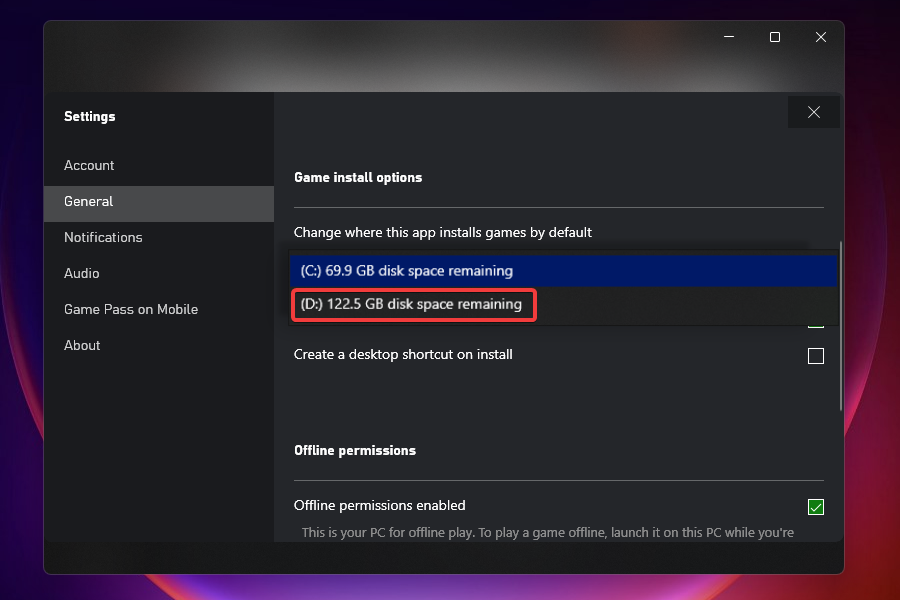
- Click on the dropdown menu under Change where this app installs by default.

- Select the desired drive from the list of options.

- Restart the computer and check if the drive you were facing issues with earlier can be used for installing apps.

While some may have already given this method a try, it’s imperative to mention it since this is the most critical aspect and one that helps diagnose the issue.
A small yellow warning box next to an option indicates that the problem lies with the drive itself and not the app storage settings. You can format the drive in that case, but we recommend trying the other fixes listed below before going for the extreme.
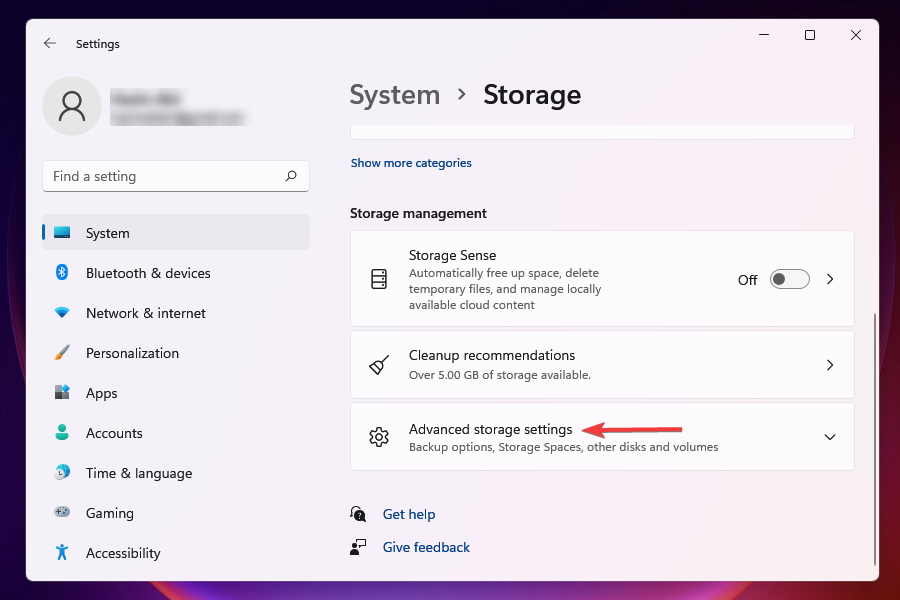
2. Change the system storage settings
- Press Windows + I to launch the Settings app, and click on Storage from the list of options available on the right in the System tab.

- Select Advanced storage settings under Storage management.

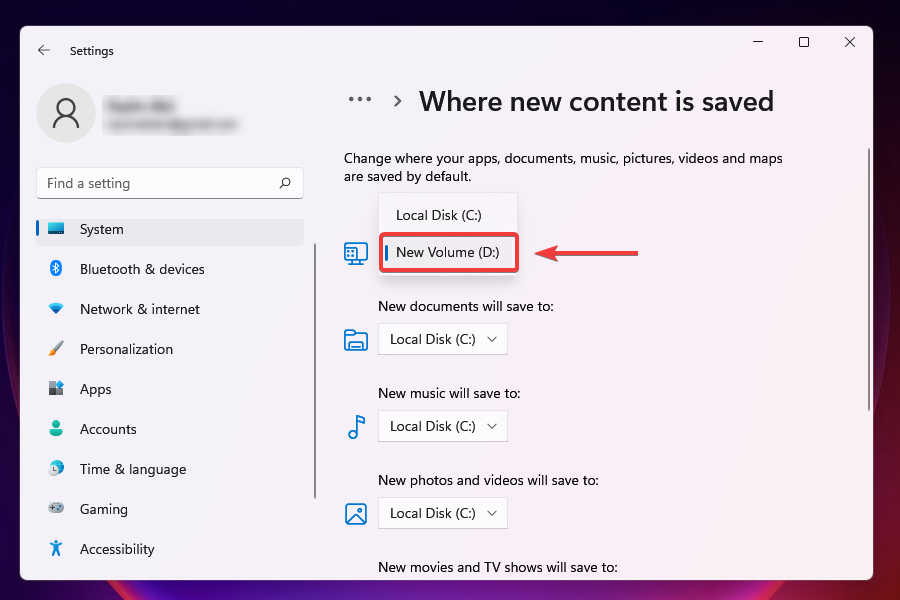
- Click on Where new content is saved from the list of options that appear.

- Select the dropdown menu under New apps will save to select the desired drive.

- Click on Apply for the changes to come into effect.

- Restart the computer and check if you can select another drive while downloading a game.


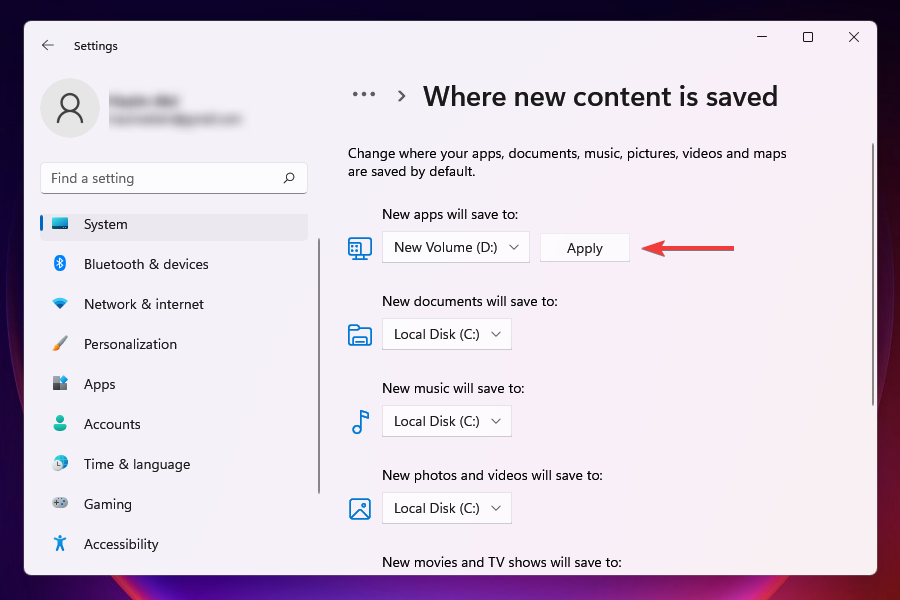
The current settings on your PC may prevent the Xbox app from changing the drive when downloading a game. After you have adjusted the default settings, check if the Xbox app still can’t choose drive. Suppose that’s the case, head to the following method.
3. Modify Folder Permissions
- Press Windows + E to launch File Explorer, and navigate to the drive where you want to install the apps (in our case, it’s the D: drive).
- Locate the WindowsApps folder. If you cannot find one, create a new folder by the same name.
- Right-click on the WindowsApps folder and select Properties from the context menu. Alternatively, you can select the folder and hit Alt + Enter to launch the Properties window.

- Navigate to the Security tab and select Advanced.

- Click on Continue in the Permissions tab of the Advanced Security Settings window.

- Select Change to modify the permissions and grant access to the folder.

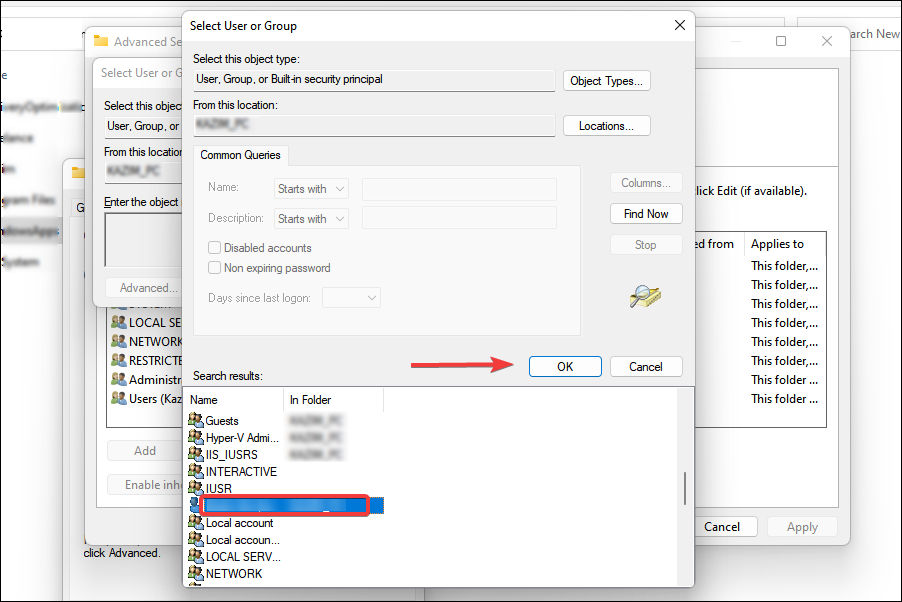
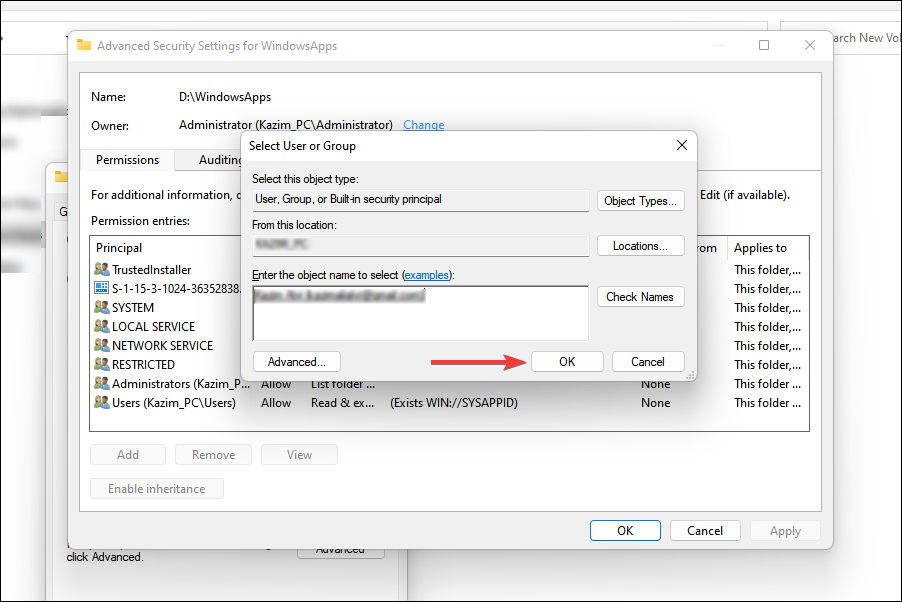
- Click Advanced in the Select User or Group window.

- Click on Find Now.

- Select your user account from the list at the bottom and click on OK.

- Click OK in the Select User or Group window.

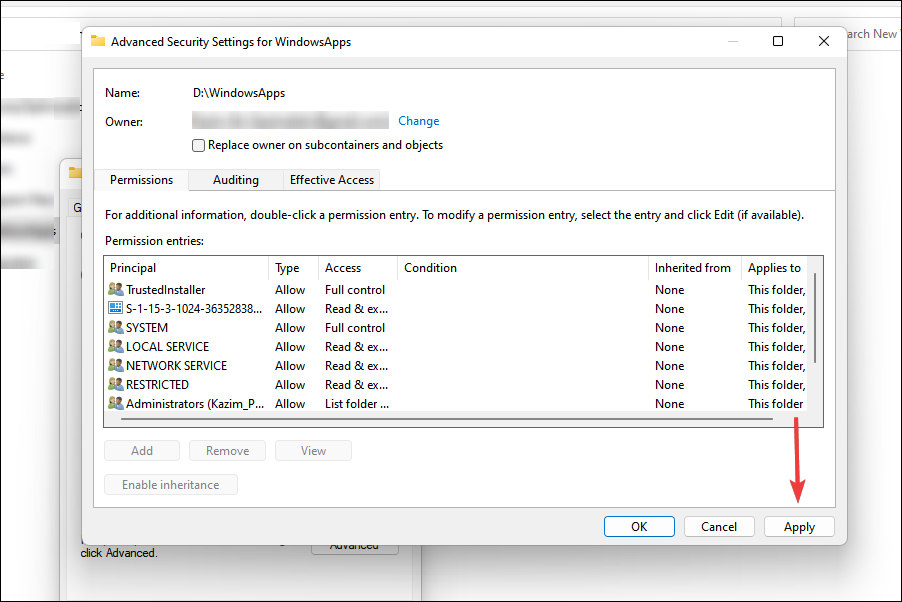
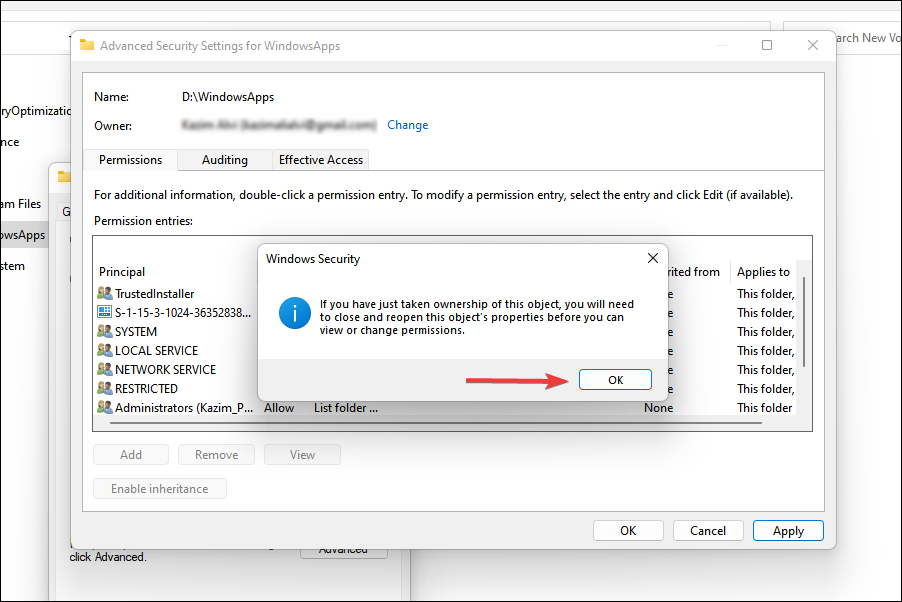
- Click on Apply to save the changes.

- Select OK in the Windows Security prompt that appears.

- Finally, click OK to close the window.
- After making the changes, restart the computer and check if you can now save the games to the selected drive.
4. Update Windows
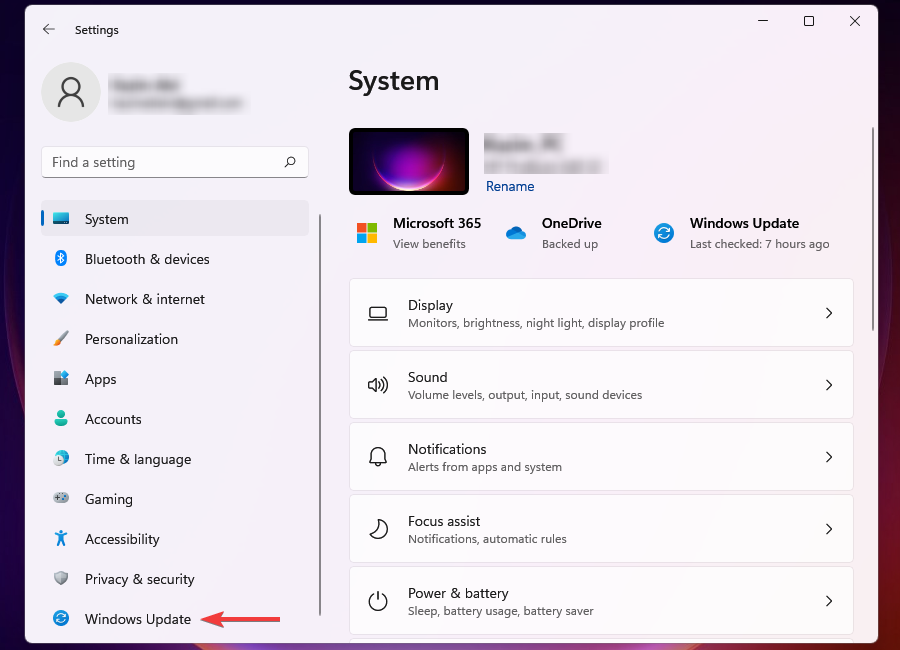
- Press Windows + I to launch the Settings app, and select Windows Update from the tabs listed in the navigation pane on the left.

- Click on Check for Updates to scan for any pending updates, and download and install them to your computer.

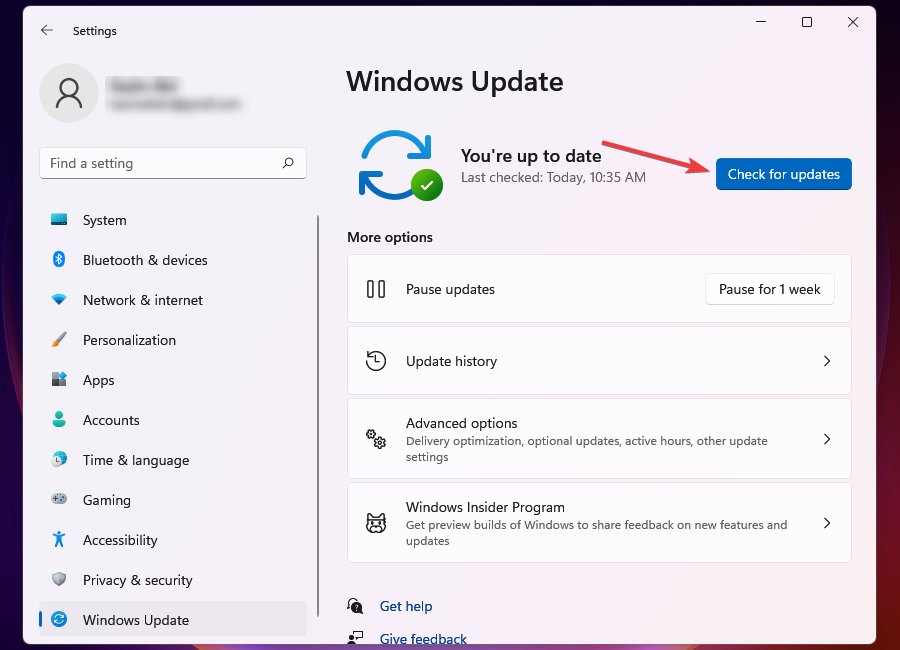
If you are running an outdated version of Windows, or there’s a bug in the current version preventing you from selecting another drive, try updating the Windows. And once done, check if the Xbox app can’t choose drive problem is fixed.
When you install the latest version, apart from features, a bunch of patches for the bugs in the previous version are also installed. This has fixed the issue for many users, and you must try it before proceeding.
If you are having trouble accessing the Settings app, an issue reported by many users, find out what to do when the Settings app crashes.
5. Restart the Xbox services
- Press Windows + R to launch the Run command, type services.msc in the text field, and either click OK at the bottom or hit Enter to launch the Services app.

- Locate the services starting with Xbox, right-click on them and select Restart from the context menu.

- Repeat the process for all such services that are currently running.

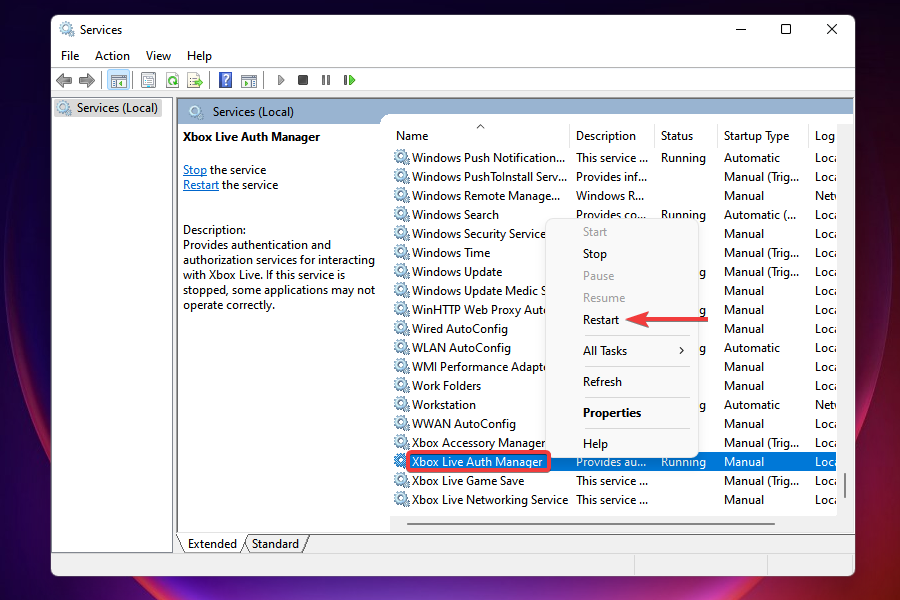
If the Xbox services have encountered a bug while running, restarting them will give them a fresh start and fix any such bugs. Once done, check if the Xbox app resolves the issue that you can’t choose a driver. If not, the following solution would help.
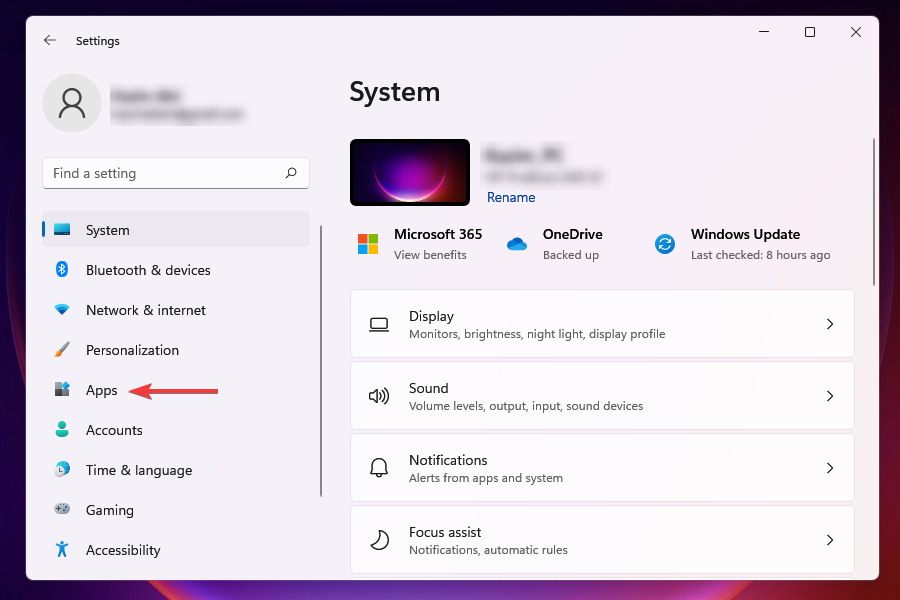
6. Repair the Xbox app
- Press Windows + I to launch Settings, and select Apps from the tabs listed in the navigation pane on the left.

- Click on Apps & features on the right.

- Scroll down, locate and click on the ellipsis next to Xbox, and select Advanced options from the menu.

- Click on Repair under Reset.

- Please wait for the process to complete; it shouldn’t take more than a few minutes.
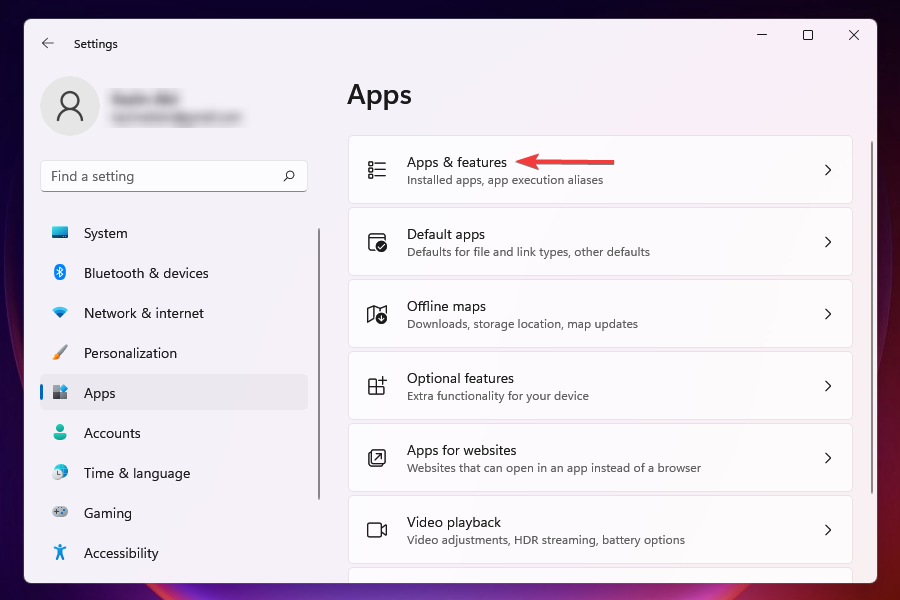
While most users go around uninstalling an app in case of trivial issues, the Repair option is more than capable of fixing the problem. Also, you don’t lose any data when repairing an app, as opposed to when you uninstall it.
This will also come in handy when the Xbox app for Windows is not detecting any of my drives.
7. Make changes to the Registry
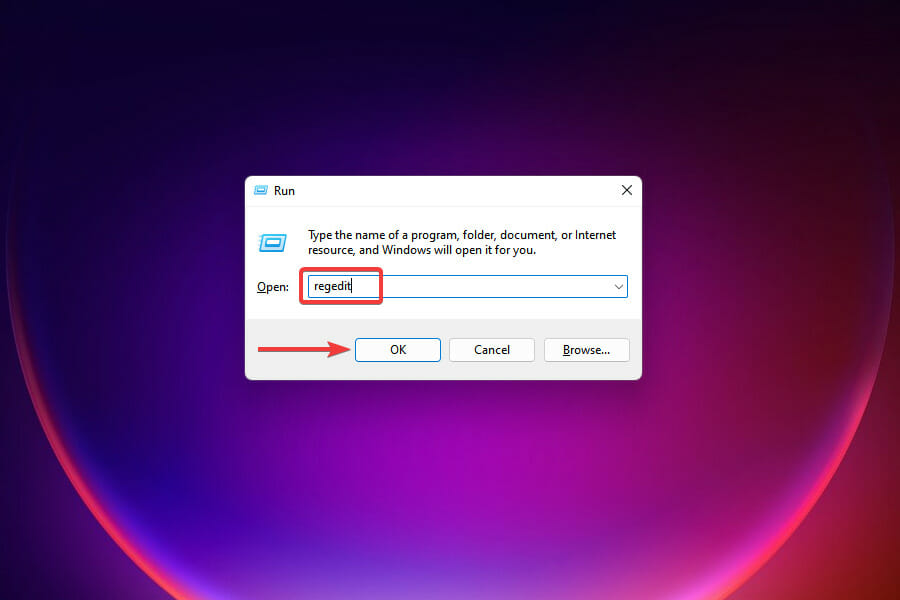
- Press Windows + R to launch the Run command, type regedit in the text field, and click on OK or press Enter to launch the Registry Editor.

- Click Yes on the UAC prompt that appears.
- Paste the following path in the address bar at the top and hit Enter:
HKEY_LOCAL_MACHINE\SYSTEM\CurrentControlSet\Services\GamingServices - Now, right-click on its entry in the navigation pane on the left and select Delete from the context menu.

- Select Yes in the confirmation box that appears.

- Similarly, paste the following address and hit Enter:
HKEY_LOCAL_MACHINE\SYSTEM\CurrentControlSet\Services\GamingServicesNet - Again, right-click on the entry in the navigation pane and select Delete.

- Click Yes in the confirmation box that appears.
- Close the Registry Editor and restart the computer.
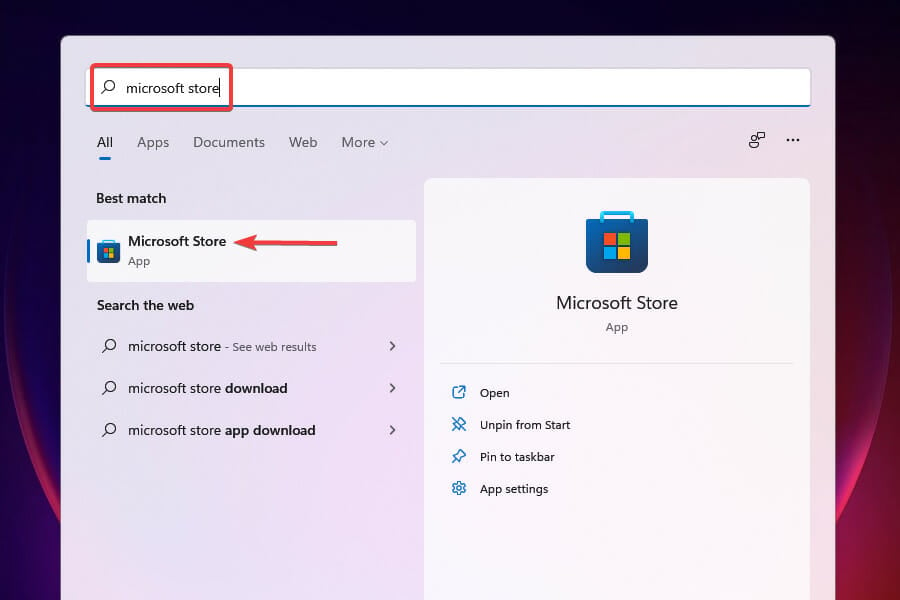
- After the PC restarts, press Windows + S to launch the Search menu, enter Microsoft Store in the text field at the top, and click on the relevant search result to launch the app.

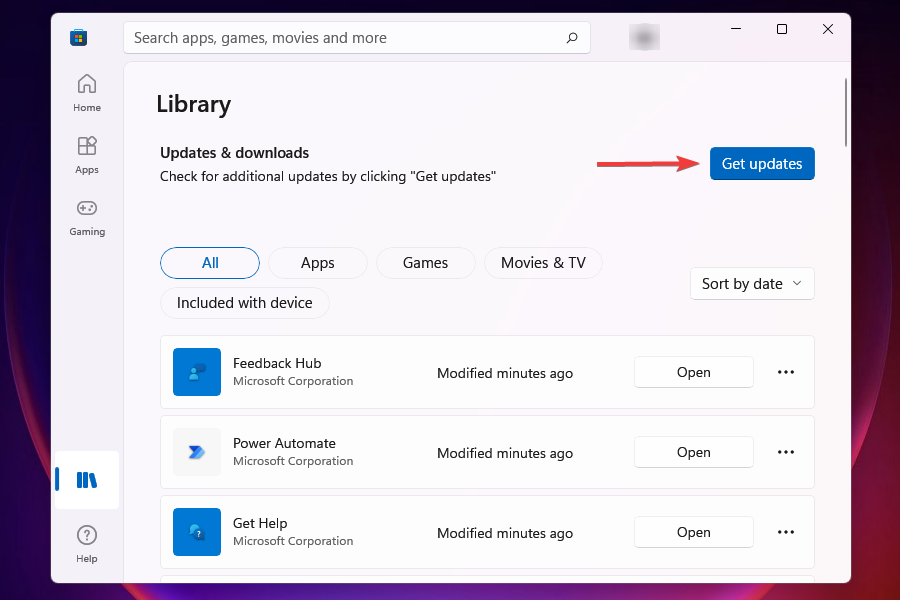
- Click on Library near the bottom-left corner.

- Click on Get updates.

- Download the updates for Gaming Services that appear.

This fix works when the Xbox app won’t let me choose drive. Then, when you reinstall the updates, it solves many bugs or corruptions leading to the error.
Even if this doesn’t work with the other methods mentioned above, you are left with no option but to format the drive.
8. Format the drive
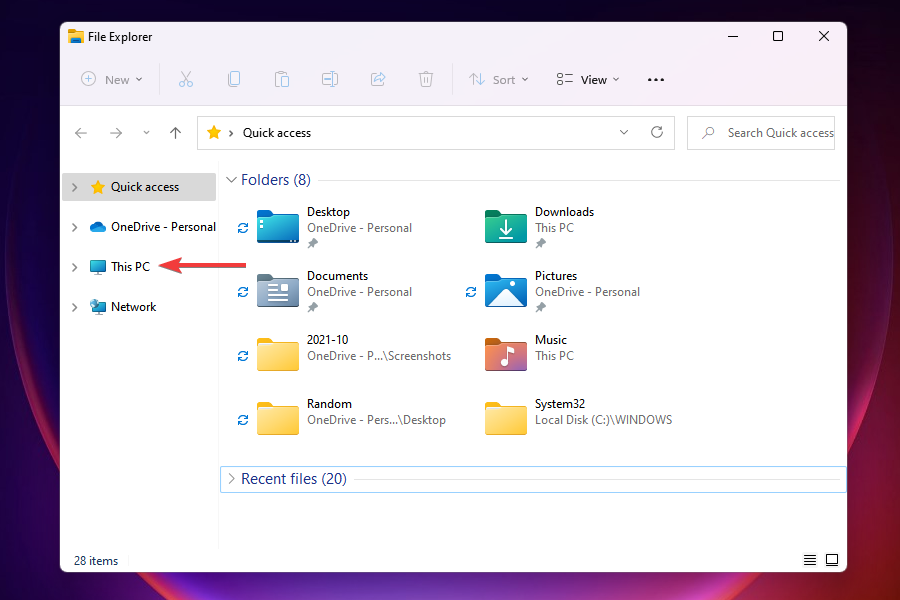
- Press Windows + E to launch File Explorer, and click on This PC on the left to view the available drives.

- Right-click on the drive to which you were having trouble installing the apps and select Format from the context menu.

- In the format window, ensure NTFS is selected under File system, and click on Start at the bottom. It’s recommended that you don’t make any other changes to the default settings and proceed as is.

- The format process will take a while, depending upon the hard disk’s speed and the amount of data stored on it.
If the drive that you want to install games to is corrupted or in a file system that is not compatible, you are likely to encounter the Xbox app can’t choose drive error on Windows 11.
In this case, a recommended system for drives is NTFS, and changing the file system to this will fix the problem. Also, for corruption, formatting the drive is an ideal solution.
We scoured through various online platforms, and this method worked for most users who could not get things up and running with the previous ones.
After formatting the drive, you should be able to install games from the Xbox app to it. If you are facing trouble, go through our dedicated guide on how to solve drive formatting errors.
How can I enjoy Xbox Game Pass on Windows 11?
Once done with the issue, you must check out a fantastic offering by Microsoft, the Xbox Game Pass. It allows you to browse through and play 100+ games available on the platform at a small monthly subscription fee.
You will find it in the Xbox app. In addition, thereus subscriptions are available to cater to users with all needs.
The above fixes must have resolved the Xbox app can’t choose drive error. If you still encounter the problem after executing all the methods mentioned here, there’s always the option to reset Windows 11 to its factory settings.
If that doesn’t work, it’s likely an issue with the Windows itself, and you may roll back to Windows 10. Keep checking gaming or similar forums for updates from other users, and once the problem is fixed, you can reinstall Windows 11.
After reverting to Windows 10, try these fixes if you cannot access the Xbox app.
Have the above procedures worked for you? Let us know your experience in the comments section below.
Read our disclosure page to find out how can you help Windows Report sustain the editorial team. Read more


Improve this guide


User forum
6 messages